


E D U C A T I O N
INSULIN
I N S U L I N
Giving a Single-Dose Insulin Shot: Care Instructions
Your Care Instructions
Insulin is normally made by the pancreas, a gland behind the stomach. In people with diabetes, the pancreas no longer makes enough insulin or it stops making it. Without insulin, your blood sugar level rises to dangerous levels. When this happens, you need insulin shots to keep your blood sugar in your target range.You may be nervous giving a shot at first. But soon, giving yourself a shot will become routine. It is quite easy to learn how to draw up insulin into a syringe and give the shot. The needles you use to give the insulin injections are very thin, and most people who have diabetes say they do not even feel the needle enter the skin. Even if you do feel the injection, the sting of the shot is not bad and does not last long. More than half a million people do it every day. You can too.Follow-up care is a key part of your treatment and safety. Be sure to make and go to all appointments, and call your doctor if you are having problems. It's also a good idea to know your test results and keep a list of the medicines you take.
How can you care for yourself at home?
Getting started
- If you have poor eyesight, have problems using your hands, or cannot prepare a dose of insulin, you may need someone to prepare your insulin injections ahead of time.Gather your supplies. You will need an insulin syringe, your bottle of insulin, and an alcohol wipe or a cotton ball dipped in alcohol. Keep your supplies in a bag or kit so you can carry the supplies wherever you go.
- Check the insulin bottle label and contents. Read and follow all instructions on the label, including how to store the insulin and how long the insulin will last.
- Wash your hands with soap and running water. Dry them well.
- Preparing the shot
For a single type of insulin shot:
- Roll the bottle gently between your hands. This will warm the insulin if you have kept the bottle in the refrigerator. Roll a bottle of cloudy insulin between your hands until the white powder has dissolved and the solution is mixed.
- Wipe the rubber lid of the insulin bottle with an alcohol wipe or a cotton ball dipped in alcohol. (If you are using a bottle for the first time, remove the protective cover over the rubber lid.) Let the top dry before you remove any insulin.
- Remove the plastic cap from the needle on your insulin syringe. Take care not to touch the needle.
- Pull the plunger of the syringe back, and draw air into the syringe equal to the number of units of insulin to be given.
- Insert the needle of the syringe into the rubber lid of the insulin bottle. Push the plunger of the syringe to force the air into the bottle. This equalizes the pressure in the bottle when you remove the dose of insulin. Leave the needle in the bottle.
- Turn the bottle and syringe upside down, and hold them in one hand. Position the tip of the needle so that it is below the surface of insulin in the bottle. Pull back the plunger to fill the syringe with slightly more than the correct number of units of insulin to be given.
- Tap the outside (barrel) of the syringe so that trapped air bubbles move into the needle area. Push the air bubbles back into the bottle. Make sure you now have the correct number of units of insulin in your syringe.
- Remove the needle from the bottle. Now you are ready to give the shot.
Giving the Shot
Before giving your shot:
- Use alcohol to clean the skin before you give the shot. Let it dry.
- Slightly pinch a fold of skin between your fingers and thumb of one hand.
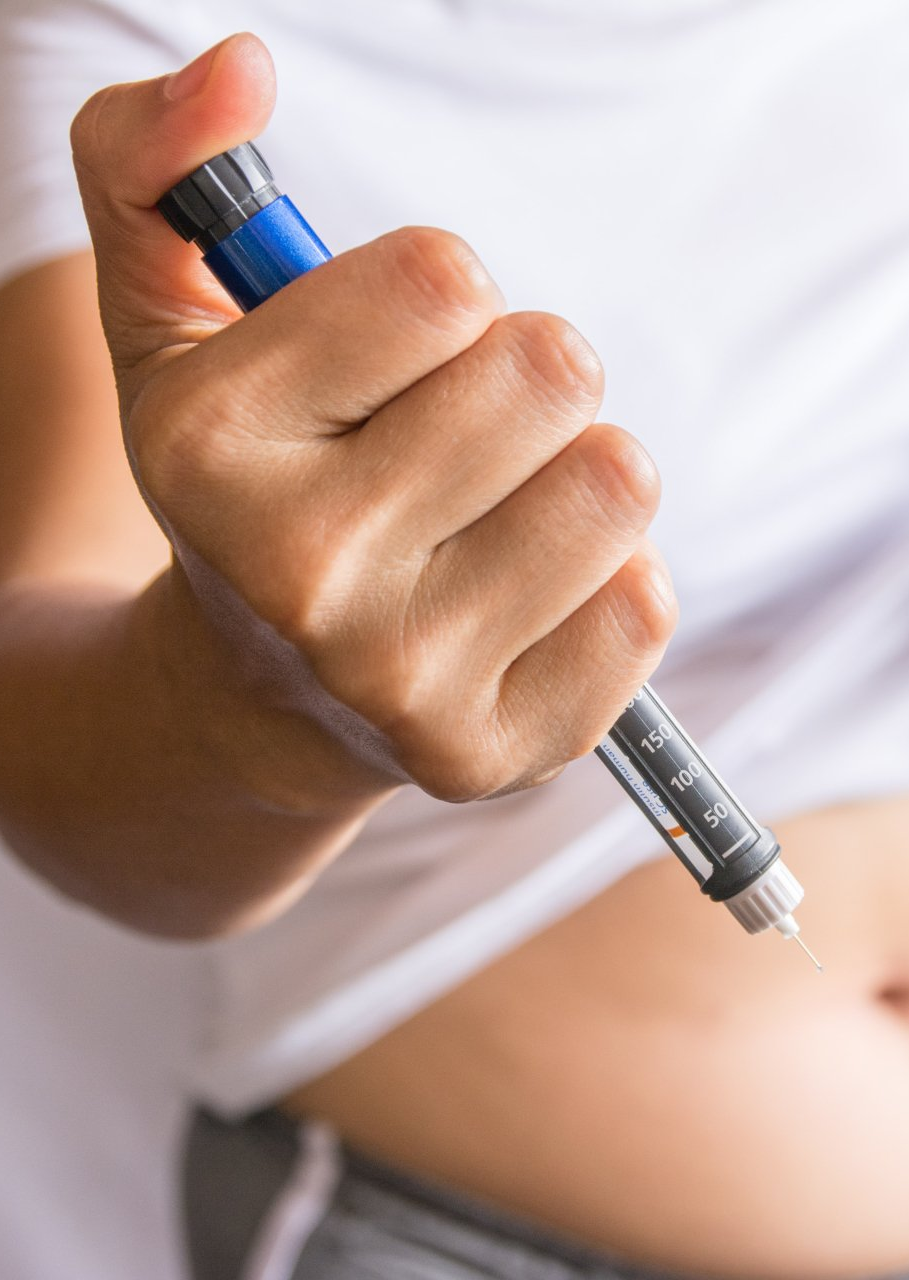
- Hold the syringe like a pencil close to the site, keeping your fingers off the plunger. It is usually recommended to place the syringe at a 90-degree angle to the shot site, standing straight up from the skin.
- Bend your wrist, and quickly push the needle all the way into the pinched-up area.
- Push the plunger of the syringe all the way in so the insulin goes into the fatty tissue.
- Take the needle out at the same angle that you inserted it. If you bleed a little, apply pressure over the shot area with your finger, a cotton ball, or a piece of gauze. Do not rub the area.
- Replace the cover over the needle and dispose of the needle safely. Do not use the same needle more than one time.
Where to give the shot
You can inject insulin into:
- The belly, but at least 2 inches from the belly button. This is considered the best place to inject insulin.
- The top outer part of the thighs. Insulin usually is absorbed more slowly from this site, unless you exercise soon after giving the shot.
- The outside of the upper arms. You may need help giving yourself shots in this area.
- The buttocks. You may need help with injections in the buttocks.
- Your doctor may advise you to give your shots in different places on your body each day. This is called site rotation. If you are going to rotate sites, check with your doctor to make sure you know how to do it right. Use the same site at the same time of each day.
For example, each day:
- At breakfast, give the shot in one of your arms.
- At lunch, give the shot in one of your legs.
- At dinner, give the shot in your belly.
- Slightly change the spot where you give an insulin shot each time you do it. For example, use five different places on the right upper arm, then use five places on the left upper arm. Using the same spot every time can cause bumps or pits in the skin and make the shots hurt more. It may also slow down how the insulin is absorbed into your body.
Giving a Mixed-Dose Insulin Shot: Care Instructions
Your Care Instructions
Insulin is normally made by the pancreas, a gland behind the stomach. In people with diabetes, the pancreas no longer makes enough insulin or it stops making it. Without insulin, your blood sugar level rises to dangerous levels. When this happens, you need insulin shots to keep your blood sugar in your target range.
You may be nervous giving a shot at first. But soon, giving yourself a shot will become routine. It is quite easy to learn how to draw up insulin into a syringe and give the shot. The needles you use to give the insulin injections are very thin, and most people who have diabetes say that they do not even feel the needle enter the skin. Even if you do feel the injection, the sting of the shot is not bad and does not last long. More than half a million people do it every day. You can too.
Follow-up care is a key part of your treatment and safety. Be sure to make and go to all appointments, and call your doctor if you are having problems. It's also a good idea to know your test results and keep a list of the medicines you take.
How can you care for yourself at home?
Getting started
Gather your supplies. You will need an insulin syringe, your bottles of insulin, and an alcohol wipe or a cotton ball dipped in alcohol. Keep your supplies in a bag or kit so you can carry the supplies wherever you go.
Check the labels on the bottles and contents. Read and follow all instructions on the label, including how to store the insulin and how long the insulin will last.
Wash your hands with soap and running water. Dry them well.
Preparing the Shot
For a mixed-dose insulin shot:
Roll the insulin bottles gently between your hands. This will warm the insulin if you have kept the bottle in the refrigerator. Roll the cloudy insulin bottle until the white powder has dissolved and the insulin is mixed.
Wipe the rubber lid of both insulin bottles with an alcohol wipe or a cotton ball dipped in alcohol. (If you are using a bottle for the first time, remove the protective cover over the rubber lid.) Let the top dry before you remove any insulin.
Remove the plastic cap from the needle on your insulin syringe. Take care not to touch the needle. Pull the plunger back on your insulin syringe, and draw air into the syringe equal to the number of units of cloudy insulin to be given.
Push the needle of the syringe into the rubber lid of the cloudy insulin bottle. Push the plunger of the syringe to force the air into the bottle. This equalizes the pressure in the bottle when you later remove the dose of insulin. Remove the needle from the bottle, but do not draw up any insulin.Pull the plunger of the syringe back and draw air into the syringe equal to the number of units of clear insulin to be given.Push the needle of the syringe into the rubber lid of the clear insulin bottle. Push the plunger to force the air into the bottle. Leave the needle in the bottle.
Turn the bottle and syringe upside down, and hold them in one hand. Position the tip of the needle so that it is below the surface of insulin in the bottle. Pull back the plunger to fill the syringe with slightly more than the correct number of units of clear insulin to be given. Tap the outside (barrel) of the syringe so that trapped air bubbles move into the needle area. Push the air bubbles back into the bottle. Make sure that you have the correct number of units of insulin in your syringe. Remove the needle from the clear insulin bottle. Insert the needle into the rubber lid of the cloudy insulin bottle. Do not push the plunger, because this would force clear insulin into your cloudy insulin bottle. If clear insulin is mixed in the bottle of cloudy, it will change the action of your other doses from that bottle.
Turn the bottle and syringe upside down and hold them in one hand. Position the tip of the needle so that it is below the surface of insulin in the bottle. Slowly pull back the plunger of the syringe to fill the syringe with the correct number of units of cloudy insulin to be given. This will keep air bubbles from entering the syringe. Remove the needle from the bottle.You should now have the total number of units for the clear and cloudy insulin in your syringe. For example, if 10 units of clear and 15 units of cloudy are needed, you should have 25 units in your syringe. Now you are ready to give the shot.
Giving the Shot
Before giving your shot:
Use alcohol to clean the skin before you give the shot. Let it dry.
Slightly pinch a fold of skin between your fingers and thumb of one hand.
Hold the syringe like a pencil close to the site, keeping your fingers off the plunger. It is usually recommended to place the syringe at a 90-degree angle to the shot site, standing straight up from the skin.
Bend your wrist, and quickly push the needle all the way into the pinched-up area.
Push the plunger of the syringe all the way in so the insulin goes into the fatty tissue.
Take the needle out at the same angle that you inserted it. If you bleed a little, apply pressure over the shot area with your finger, a cotton ball, or a piece of gauze. Do not rub the area.
Replace the cover over the needle and dispose of the needle safely. Do not use the same needle more than one time.
Where to give the shot
You can inject insulin into:
The belly, but at least 2 inches from the belly button. This is thought to be the best place to inject insulin. The top outer part of the thighs. Insulin usually is absorbed more slowly from this site, unless you exercise soon after giving the shot.
The outside of the upper arms or the buttocks. You may need help giving shots in these areas. Your doctor may advise you to give your shots in different places on your body each day. This is called site rotation. Make sure you talk to your doctor about how to do this safely.
If you rotate sites, use the same site at the same time of each day. For example, each day:
At breakfast, give the shot in one of your arms.
At lunch, give the shot in one of your legs.
At dinner, give the shot in your belly.
Slightly change the spot where you give an insulin shot each time you do it. For example, use five different places on the right upper arm, then use five places on the left upper arm. Using the same spot every time can cause bumps or pits in the skin and make the shots hurt more. It may also slow down how the insulin is absorbed into your body.
Learning About Insulin Pens
What is an insulin pen?
An insulin pen is a device for giving insulin shots. It looks like a pen. Inside the pen is a needle and a cartridge filled with insulin. You can set the dose of insulin with a dial on the outside of the pen. You use the pen to give the insulin shot. Both disposable and reusable insulin pens are available.
Learning About Insulin Pumps
What is an insulin pump?
An insulin pump is a tiny computer that delivers insulin into your body. With a pump, you don't have to give yourself insulin shots throughout the day. You program the pump to do this. You can also give yourself an extra dose of insulin when you need it.
A pump may give you more freedom to eat, sleep, and exercise when you want.
Safety
Diabetic ketoacidosis (DKA) may happen more often and more quickly with an insulin pump than with shots. Your blood sugar could get too high if something goes wrong with the catheter or pump and you don't notice.
You may get an infection where the catheter goes into the skin. You'll need to take good care of the site and change the catheter on schedule.
Effort
It may take time to set up the pump. You may have to spend time at a clinic, skip a few meals, and check your blood sugar more often than usual.
Many insurance companies have strict guidelines that you will have to follow or they will not pay.
You may need to replace your infusion set every 2 or 3 days.
You may have to learn new routines in how and when you test your blood sugar and when you travel, play sports, and eat.
Counting Carbohydrate When You Take Insulin: Care Instructions
Your Care Instructions
You don't have to eat special foods when you take insulin. You just have to be careful to eat healthy foods. And you have to spread throughout the day the carbohydrate you eat. Carbohydrate raises blood sugar higher and more quickly than any other nutrient. It is found in desserts, breads and cereals, and fruit. It's also found in starchy vegetables such as potatoes and corn, grains such as rice and pasta, and milk and yogurt.
The more carbohydrate, or carbs, you eat at one time, the higher your blood sugar will rise. Spreading carbs throughout the day helps keep your blood sugar levels within your target range. Counting carbs is one of the best ways to keep your blood sugar under control when you use insulin. It helps you match the right amount of insulin to the number of grams of carbohydrate in a meal. You need to test your blood sugar several times a day to learn how carbs affect you. Then you can change your diet and insulin dose as needed.
A registered dietitian or certified diabetes educator can help you plan meals and snacks.
Follow-up care is a key part of your treatment and safety. Be sure to make and go to all appointments, and call your doctor if you are having problems. It's also a good idea to know your test results and keep a list of the medicines you take.
How can you care for yourself at home?
Know your daily amount of carbohydrate
Your daily amount depends on several things, including your weight, how active you are, which diabetes medicines you take, and what your goals are for your blood sugar levels. A registered dietitian or certified diabetes educator can help you plan how much carbohydrate to include in each meal and snack.
For most adults, a guideline for the daily amount of carbohydrate is:
45 to 60 grams at each meal. That's about the same as 3 to 4 carbohydrate servings. 15 to 20 grams at each snack. That's about the same as 1 carbohydrate serving.
Care instructions adapted under license by Alliance In Health Diabetes Control Center. This care instruction is for use with your licensed healthcare professional. If you have questions about a medical condition or this instruction, always ask your healthcare professional. Healthwise, Incorporated disclaims any warranty or liability for your use of this information.
LEARN MORE